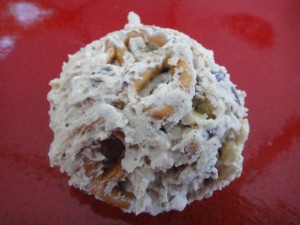
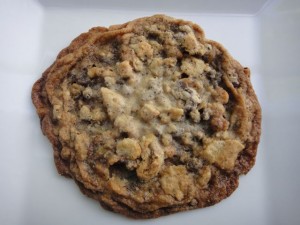
When you have a famous restaurant with interesting food, your recipes and knock-offs appear all over the Internet. I have never been to Momofuku so I can’t say anything about the originals. As I compared several of the recipes for these cookies, the base was similar but what they recommended putting in them varied so much that it is clear you can put anything in them you want. This version was in the San Jose Mercury News but is in many other places on the web as well. I went out and bought a huge scooper to make them just as recommended here but they don’t have to be so large and you just have to adjust the baking temperature accordingly.
Yield:
12 large cookies
Ingredients:
1 cup butter, at room temperature
1 cup sugar
2/3 cup brown sugar, tightly packed
1 tablespoon corn syrup
1 egg
½ teaspoon vanilla
1 1/3 cups flour
½ teaspoon baking powder
¼ teaspoon baking soda
1 teaspoon kosher salt
¾ cup mini-chocolate chips
½ cup mini-butterscotch chips
½ cup Graham Crust (see following recipe)
1/3 cup old-fashioned rolled oats
2 ½ teaspoons ground coffee
2 cups potato chips
1 cup mini pretzels
Directions:
1. Combine the butter, sugars and glucose in the bowl of a stand mixer fitted with the paddle attachment and cream together on medium-high for 2-3 minutes. Scrape down the sides of the bowl, add the egg and vanilla, and beat for 7-8 minutes. (Yes, that long.)
2. Reduce mixer speed to low; add flour, baking powder, baking soda and salt. Mix just until dough comes together, no longer than 1 minute. Scrape down the sides of the bowl.
3. Still on low, add the chocolate chips, butterscotch, graham crust, oats and coffee; mix until just blended, about 30 seconds. Add the potato chips and pretzels and paddle, still on low speed, until just incorporated. Be careful not to overmix or break too many pretzels or potato chips.
4. Using a 2¾-ounce ice cream scoop (or a 1/3-cup measure), portion out the dough onto a parchment-lined sheet pan. Pat the tops of the cookie dough domes flat. Wrap the sheet pan tightly in plastic wrap and refrigerate for at least 1 hour or up to 1 week. Do not bake your cookies from room temperature — or skimp on the chilling time — or
they will not bake properly.
5. Heat the oven to 375 degrees. Arrange the chilled dough a minimum of 4 inches apart on parchment-lined baking sheets. Bake for about 18 minutes. The cookies will puff, crackle and spread. After about 15 minutes, start checking them. They should be browned on the edges, yet still tan in the center. Give them an extra minute if that’s not the case.
Notes:
You can throw in anything you want. Other items recommended are marshmallows, cut up candy, corn flakes or other cereals. One that came up frequently was marshmallows, chocolate chips and corn flakes. Go for it!
Graham Crust
Yield:
2 cups
Ingredients:
1 ½ cups graham cracker crumbs
¼ cup milk powder
2 tablespoons sugar
¾ teaspoon kosher salt
¼ cups butter, melted
¼ cup heavy cream
Directions:
1. Toss the graham cracker crumbs, milk powder, sugar and salt with your hands in a medium bowl to evenly distribute the dry ingredients.
2. Whisk the butter and cream together. Add to the dry ingredients and toss again to evenly distribute. The butter will act as glue, adhering to the dry ingredients and turning the mixture into a bunch of small clusters. The mixture should hold its shape if squeezed tightly in the palm of your hand. If it is not moist enough to do so, melt additional 1 to 1½ tablespoons butter and mix it in.
3. Spread out on parchment sheet. Bake at 375 degrees for about 7 to 10 minutes. May need more time to brown depending on how much you flatten it out.
4. Eat immediately or deploy as directed in the recipe. If using as a piecrust, the crust is easiest to mold just after mixing. Stored in an airtight container, graham crust will keep fresh for 1 week at room temperature, or 1 month in the fridge or freezer.


I think this is the most interesting looking cookie dough you have ever photographed, probably because it look so different from the finished product. the dough is so white!